We here at Nekotaku Gaming have long been fans of Dangerpuff–pretty much since he was born. Most recently, he launched a gaming channel on YouTube, and we’ve been eagerly anticipating his latest release, which turned out to be his best one yet! In it, he details how to farm artifacts using A/B routes, instead of N+1 routes. Read on to find out that one weird trick to melt belly fat, reverse aging and accrue massive amounts of artifacts while doing it!
3.8 Update: The latest routes are on https://www.puffexplorer.com, a new interactive map currently in beta mode.
This is a quick rundown of Genshin Impact’s best new artifact farming method for version 3.2. If you’re unfamiliar with what artifact routes are, start here and come back later. Otherwise, the trick is that you use two routes that share a large set (41) of high-efficiency 12-hour artifact respawns. This makes the two resulting routes very efficient. Each route takes under 15 minutes to complete. Here’s how to do it:
- Run Route A on one day, and Route B on the next.
- You must wait both a daily reset and 12 hours to do the next route.
- Thus, you can always run the alternate route 12 hours after daily reset.
Route A: 127 investigations (75k avg xp)
Route B: 125 investigations (72.4k avg xp)
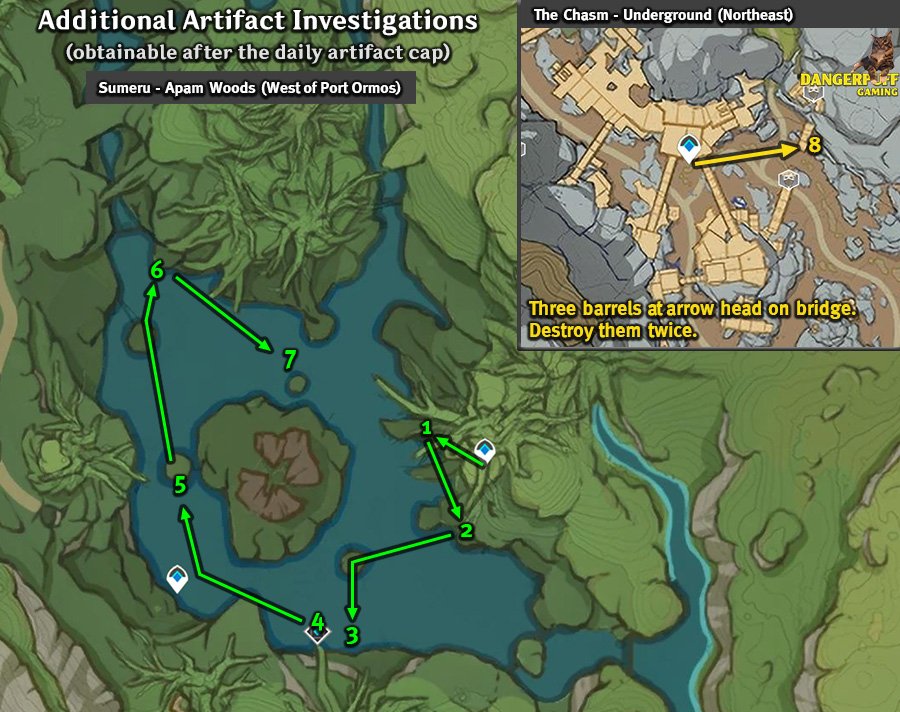
Note: There is a handful of investigations that can be appended to any route in Apam Woods (7) and the Chasm (1).
Route A
Video Guide
Image Guide
Click sub-routes in the following images for additional detail.


Route B
Video Guide
Image Guide
Click sub-routes in the following images for additional detail.


Appendix: Additional Route Investigations (Apam Woods & The Chasm)
No matter what route you take, the below artifact investigation spots can be completed after your artifact route is complete. They do have their own 24 hour respawn timers, though.
Video Guide
Image Guide

Artifact Farming Methods: A Basic Overview
Artifacts and their Importance
Character strength in Genshin Impact is determined by a combination of several factors (level, weapon, talents, etc), but the majority of it comes from their artifacts. Continually improving the strength of your account’s artifacts, trading down and out the bad pieces, and learning how to build up and move around sets are an every day part of most players’ end games.
A 5 star artifact costs 270,475 XP to max out. But how do you level them?
Fodder from non-talent Domains
Most non-talent domains have either a ley line blossom you can collect artifacts from or mobs within that can drop 2 star and up artifacts. Unsurprisingly, an artifact domain is the fastest way to collect artifact XP. The resin you need to collect from these domains is limited by your time or money though. So if you aren’t a whale, you might consider alternate methods of getting fodder.
Serenitea Pot
While they’re pretty expensive, you can choose to spend your house’s resin on Sanctifying Unction (90 realm currency for 2,500 XP) and Sanctifying Essence (360 realm currency for 10,000 XP). This is a good option for players who can’t spend long on the game and gather lots of realm currency. Mora and XP books are a much better value to anybody doing the below farming methods though.
Fodder from open world elites / bosses
When you have the time, you ought to kill elites due to the chance that they’ll drop a 3 or 4 star artifact. While the drop rate is fairly low, you can still manage to pull roughly 60k mora and 30k artifact XP per hour by efficiently farming open world elites. This rate improves by about 33% with a good co-op team, and of course you can keep hopping between each others’ worlds as you run out of mobs to slay. Co-op will require some coordination on your part though. I would recommend using big Discord communities or fan forums, and to include the route you’ll be taking with your advertisement.
What’s an artifact route and why should I do it?
If you choose to collect only artifacts for your shiny white investigations on the map, like in this route guide, you can gain upwards of 78k artifact experience in under 15 minutes. Over the course of a week, this equals two (2) completely maxed out artifacts. Sustaining this kind of artifact boost is the most significant thing you can do for your account’s overall strength and long-term progression.
Artifact Farming Limits and Exceptions
- 100 investigations per daily server cycle.
- Genshin Impact enforces this limit by not spawning any new points after the 100th investigation point is collected.
- By collecting your 100th artifact in a brand new zone (where many other artifacts are spawned nearby), you can collect a sizable overcap of artifacts.
- As of v3.2, the two best zones for overcapping are Khemenu Temple (28 artifacts) and Tatarasuna (25 artifacts). This makes the optimal routes 127 + 124 artifacts long respectively, before exceptions are considered.
- Exception 1: Tatarasuna can have up to 5 more artifacts by shooting the cannons.
- Exception 2: There are 7 daily artifact respawns in Apam Woods, inside the poppable bubbles (additional investigations guide). These can be farmed for additional experience after any route, presumably because they have already spawned.
- Exception 3: Similarly, there is a single repeatable artifact in The Chasm (the same guide) that can be farmed after these routes.
- Exception 4: Event and commission-based investigations typically do not count towards your daily investigation limit (specifically the investigation points with yellow circles below them).
- 24 hour / 12 hour artifact respawns
- Most artifact investigations take 24 hours to respawn.
- A small number take 12 hours.
- Not all artifact investigations are equal
- There are “Mora” and “No mora” artifacts. As per KeqingMains:
- “No mora” class – Spots from this class never drop Mora and always drop a single piece of artifact with 65% chance it being white artifact and 35% chance for green.
- “Mora” class – Spots from this class always drop some amount of mora (200 on average), also they always drop white artifacts (1.5 on average) and never drop green artifacts.
- The average XP for a “mora” class investigation is therefore 1.5 white artifacts, but only 1.35 for “no mora” investigations. Thus, when route-building, “mora” class artifacts should be considered the superior class, and optimal routes should try to build in more of them.
- There are “Mora” and “No mora” artifacts. As per KeqingMains:
Artifact Route Methods
Given these limitations above, there are a few ways of doing artifact routes efficiently. Before Sumeru was released, there weren’t enough artifacts to support multiple high XP routes. The N+1 route was the most efficient as it allowed for the most artifact routes per patch cycle, but it had a very weak relay route. This has changed in v3.2, N+1 routes have gotten significantly better, to the point where the relay is strong enough to be run every other day. These types of routes are called A/B routes (alternating routes, dual routes, whatever floats your boat), and are extremely flexible compared to traditional artifact routes. The value of this flexibility will vary depending on a player’s schedule volatility, but chances are good it will let you run a few routes you may have missed otherwise due to bad timing. The fastest among these A/B routes is detailed in the guide above.
Source and Disclaimer
This guide is based on routes created and optimized by the NGA forums, a thriving Chinese Genshin Impact community. Their Spiral Abyss stats are commonly referenced for people trying to team-build for the abyss. They are also avid artifact hunters. They just don’t have a website dedicated to cats like me, but we can’t all be perfect, so check out this link to their main thread on the topic of recommended artifact investigation routes. Their artifact section is incredibly thorough.
They used a bunch of programming voodoo to compile the routes, and focused on efficiency (XP/s). I couldn’t dissect their route-compiling program since it wanted me to pay for a license to run it. No thanks! Instead, I scavenged through the GitHub, studied their videos, translated the routes over, identified the best set, and started practicing it.
I and they both welcome you to explore their results. Per their main post, (Google translated) “The route planning program is written based on R language and Gurobi solver. The project has been open sourced at https://github.com/evanliu3594/GenshinArtifactFarming. Interested friends are welcome to try it.”
Given that you can really only get 127 or 124 artifacts on a route at a maximum (see Limits earlier in this guide and their exceptions), the only other real considerations are experience and time. While you could try to max out one or the other, why not both? Since this is one of the fastest artifact routes I’ve run, I’m inclined to trust their program results.
Some will argue the N+1 routes are equal to or better than the A/B route. And I’ll personally tell them they’re silly because A/B routes are N+1 routes if you care to play them that way, they’re just more far flexible in practice. Anyways, I did add a cannon artifact to route B since it was directly on the way. Otherwise, the routes and time calculations are from NGA; whereas the graphics, video, and everything else on this guide are done by me.
Finally, if you haven’t fully explored the desert, you may have a bad time. The unofficial interactive map with community comments can help you figure out certain teleports you haven’t unlocked yet. Great site for any exploration needs.


João December 12, 2022
Thank you so much.
frostweather December 17, 2022
I swear this is the most useful artifact-farming-related site there is
oceanic January 2, 2023
Very nice guide! Thank you very much. I have been using it for a few days now.
You most likely know this already but I haven’t seen it in your guide. The thimbleweeds in the desert area can drop artifacts after you hit the limit. I don’t think it’s really worth doing, especially if one does not have Sayu or Yelan.
Shankar March 22, 2023
I used to be able to see image routes in image guide … now I can’t.. don’t know why.
dangerloaf March 23, 2023 — Post Author
Sorry for that. This should be working again now. Thanks for the heads up!
joe November 11, 2023
any new good spots in fontaine?